How To Waterproof Wooden Sink Using Epoxy, Tung Oil & Varnish?
For those who aren’t aware of wooden sinks, it might come off as a completely bizarre idea to have a wooden sink. However, wooden sinks are actually made and used by a lot of our DIY lovers. It’s pretty amazing how you can make a beautiful sink out of wood.
Cedar is often used to make wooden sinks because it is naturally resistant to termite attacks, rotting and decaying. Its natural dark brownish color coupled with its affordable price makes it the perfect choice.
It’s time to acknowledge the elephant in the room. How to waterproof the wooden sink? It’s after all wood – worst affected by water. Not to mention, the sink would be mostly, if not constantly, under contact with moisture.
How To Waterproof Wooden Sink?
To maintain the longevity of the wooden sink, it’s really important to waterproof the wooden sink. It’ll preserve its beauty and utility for a longer period of time.
Here are a few steps that are common to both the methods I’ll be sharing. It means you NEED to do these steps before proceeding with any of the methods mentioned below.
Common steps:
Required Items:
- Sandpaper
- Dishwashing liquid / gentle soap
- Old Cloth
Steps:
1. Clean it
Firstly, you need to clean the sink inside-out to get rid of the dust, dirt or mosses, if any. Mix dishwasher liquid with water.
| Photo | Product | Buy |
|---|---|---|
 | Dawn Dish Soap, Antibacterial Hand Soap, Dishwashing Liquid, Apple Blossom Scent,19.4 Oz, Pack Of 4 + 2 Sponges | Check Price On Amazon |
Then soak a cloth in it. Use that cloth to clean the wooden sink. This would serve as a good base before waterproofing. Using any other harsh chemical/cleaner for cleaning would harm the wooden sink.
2. Dry
Now let the wooden sink dry properly. This would take around anywhere between 6-12 hours and, rarely, more than this. You should make sure that the sink is properly dry.
Even if a little bit of moisture is trapped within, it will potentially cause a lot more damage. You may ask why? It’s because the trapped moisture would rot the wood from inside making it weak and vulnerable.
How to be sure that the wood is properly dry? Drop a few drops of water and if it gets absorbed by the wood immediately, i.e., within 2-3 seconds, you’re good to go. Otherwise, wait for more hours and test again.
3. Smoothen it
After the wooden sink dries, it’s time to smoothen it. Take sandpaper and rub on the wooden sink. This would smoothen out the rough edges and lay a smooth base for waterproofing.

After having done with the common steps, you can go ahead with any of the methods mentioned below.
How To Make Wooden Sink Waterproof Using Epoxy?
Only after having done with the common steps, you should proceed with the method. In this method, we’ll be talking about epoxy.
The first thing that should concern you while applying and using anything on things like the sink, utensils or other things related to food is its food grade. You must seek answers to whether the method would be good enough for the food-related thing.
Epoxy is a kind of resin and is especially used for waterproofing and finishing wood. Well, epoxy is not considered food safe and warm water can harm epoxy as well. However, “Self-leveling bar top epoxies” and “cured epoxy” are okay.
The self-leveling bar top epoxy, as the name suggests is used by bars on their tables and it works perfectly fine. Cured epoxy, as opposed to normal epoxy, renders no health hazards at all.
Another thing that you must take care of while buying epoxy is to search for “penetrating epoxy”. This penetrating epoxy literally means it’d seep inside the wood and make it waterproof from inside. This won’t leave the slightest chance of getting water damage.
Food safe epoxy resin:
After this, we’d also use varnish to finish it. Again, the varnish is a kind of resin. This acts as an added barrier against moisture and a perfect finish.
Varnish:
| Photo | Product | Buy |
|---|---|---|
 | Rust-Oleum 207008 Marine Spar Varnish, Quart | Check Price On Amazon |
You should apply nearly 1-2 coats of epoxy to completely waterproof the wood. This method would last you for at least a couple of years.
Required Items:
Procedure [Step by Step]:
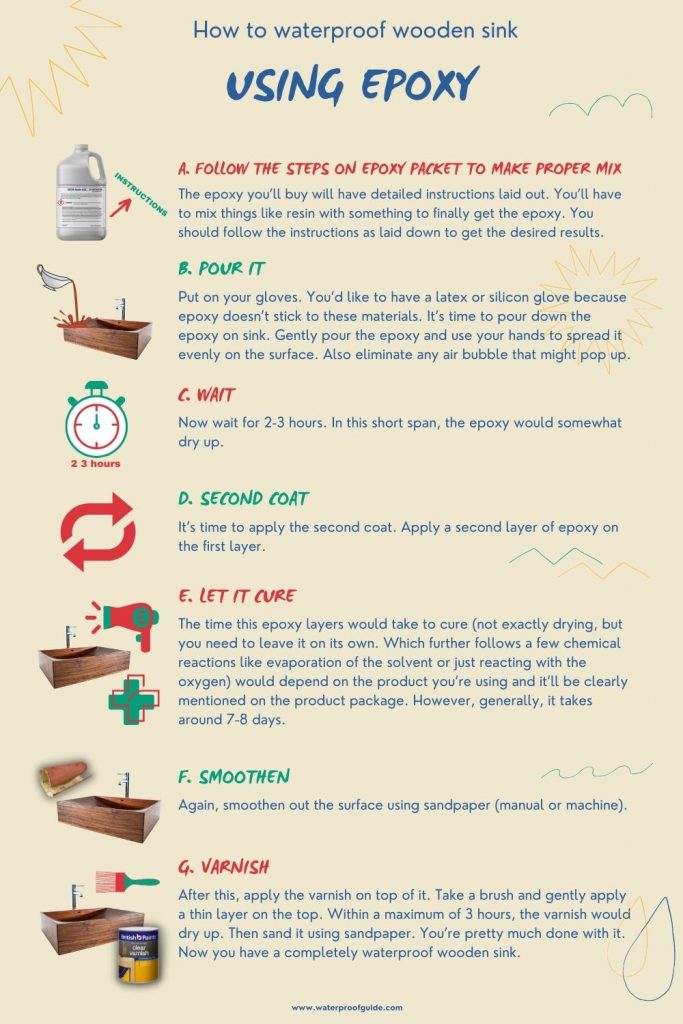
1. Follow the steps mentioned on packet
The epoxy you’ll buy will have detailed instructions laid out. You’ll have to mix things like resin with something to finally get the epoxy. You should follow the instructions as laid down to get the desired results.
2. Pour it
Put on your gloves. You’d like to have a latex or silicon glove because epoxy doesn’t stick to these materials.
It’s time to pour down the epoxy on the sink. Gently pour the epoxy and use your hands to spread it evenly on the surface. Also, eliminate any air bubbles that might pop up.
3. Wait
Now, wait for 2-3 hours. In this short span, the epoxy would somewhat dry up.
4. Second coat
It’s time to apply the second coat. Apply a second layer of epoxy on the first layer.
5. Let it cure
The time these epoxy layers would take to cure. Not exactly drying, but you need to leave it on its own.
This process enables few chemical processes like the evaporation of the solvent or just reacting with the oxygen) would depend on the product you’re using and it’ll be clearly mentioned on the product package. However, generally, it takes around 7-8 days.
6. Smoothen
Again, smoothen out the surface using sandpaper (manual or machine).
7. Varnish
After this, apply the varnish on top of it. Take a brush and gently apply a thin layer on the top. Within a maximum of 3 hours, the varnish would dry up. Then sand it using sandpaper.
You’re pretty much done with it. Now you have a completely waterproof wooden sink.
Precautions:
- You’d like to do the epoxy part in a comparatively warmer area. This would allow the epoxy to sink deeper into the wood. Whereas, a very cold or very hot temperature would negatively affect the epoxy’s curing process.
- Do the process in a well ventilated area. Whenever you do something with resin, be mindful of having an open area.
- Though epoxy has the lowest shrinkage rate among other resins, specifically search for epoxy which has a very low shrinkage rate. Otherwise some parts of the surface might just become bare after the resin shrinks.
How to Make Wooden Sink Waterproof using Tung Oil and Marine Varnish?
This method has to do with an oil i.e., tung oil and marine varnish. Oils like tung oil and linseed oil have been in use for a long period of time for waterproofing wood.
Tung oil is oil that is extracted from the nuts of tung trees which are found in China and South America. These oils are transparent and form a good finish and waterproofing agent for wood.
As the wooden sink would be in and around water and food, the thing you’re applying on the wooden sink should be food grade as well, right? Fortunately, pure tung oil is absolutely food-safe. Hence, it’ll be the best choice for your wooden sink.
Pure Tung oil:
| Photo | Product | Buy |
|---|---|---|
 | HOPE'S 100% Pure Tung Oil, Food Safe, Premium Waterproof Natural Wood Finish and Sealer for Indoor and Outdoor Projects, 32 Fl Oz, 1 Pack | Check Price On Amazon |
Next, marine varnish mainly consists of a mixture of various oils, solvents, resin and other drying agents. It works for both outdoor and indoor purposes.
When the varnish is applied along with tung oil, it gets difficult for moisture to ruin the thing. Once the varnish dries up (cures), it becomes non-toxic as well.
Marine Varnish:
| Photo | Product | Buy |
|---|---|---|
| | Rust-Oleum 207008 Marine Spar Varnish, Quart | Check Price On Amazon |
This method should last you for at least 1-2 years.
Required Items:
- Tung oil
- Marine varnish
- Brush (2)
- Sandpaper
Procedure [Step by Step]:

1. Apply the oil
First of all, make sure that you follow the steps laid under “Common steps” above.
Then, use a brush to apply the tung oil on the wooden sink evenly, carefully not to leave out any spot.
2. Let it dry and smoothen
Next, let the oil seep a bit into the wood and dry. This would take around 4-5 hours, sometimes more depending upon the weather conditions.
After that, smoothen out the surface using sandpaper. You just need to do one layer of oil as, the main thing varnish is yet to be applied.
3. Apply the varnish
It is time for varnish application. Do not shake or stir the product vigorously. Slowly open the pack and mix it slowly using a brush.
Then, using a brush, apply the varnish on the wooden sink. Make sure to move the brush in opposite directions. Firstly, apply the varnish vertically and then horizontally or vice versa. This leads to an even and smooth application.
4. Smoothen it
After the varnish layer dries off under room temperature (at most 2-3 hours), you need to use sandpaper to smoothen the varnish layer.
5. Reapply varnish
Apply 3-4 layers of the marine varnish. This would render the perfect waterproof wooden sink for you.
Let the thing cure for at least 2-3 days before putting it for use.
Precautions:
Do this method in a well-lit area. As it is oil and varnish, it might get difficult to identify the regions not coated properly.
Final Comments:
Having a waterproof wooden sink sure has its own beauty and charm. Both of these methods work well.
However, the epoxy method always wins the race as it’s more suited to the sink system. Epoxy is generally preferred by people. Have fun with your waterproofing your wooden sink!


