
How To Waterproof Photos [Step by Step Procedure & Cost]
Photos are produced on photographic paper. The way they are produced involves photo-chemical reactions. For that reason, photographic papers come with special properties such as light sensitivity and the presence of a chemically receptive upper layer.
However, this also makes unsealed photopapers highly susceptible to deterioration.
Only a little moisture is enough to do irreversible damage to your photos. Water breaks down the emulsion coating on them. The wood pulp paper base of photo papers remains vulnerable almost always.
Besides, the ink tends to get affected by water as well as with chemical pollutants in the environment like ozone. Even pigment inks, which are said to be more water-resistant than dye-based inks, can fade and smear if left unsealed for a significant amount of time.
The photo might change hues as well. So it’s always a good idea to seal and waterproof your photos, especially if you are going to use them outdoors.
How To Waterproof Photos?
Various materials can be used to make photos waterproof. Below are 3 effective and tried methods which can go a long way to protect your photos against water damage.
- Using Epoxy Resin and Mod Podge
- Using Fixative Spray and Mod Podge
- Using Cold lamination pouches
1. How To Waterproof Photos Using Epoxy Resin and Mod Podge?
Epoxy resin completely waterproofs any photo it is put on. It is a kind of plastic that dries and cures in elevated temperatures. Resins are always used in sealing and waterproofing formulations.
Applied on photos, pure epoxy resin renders protection against a considerable amount of moisture along with damage due to rough handling.
General use epoxy resins require a hardener to react and form a hard cross-polymer layer. They are mixed in a 1:1 or 2:1 ratio, as directed on the product bought.
Once the resin is poured and spread, some bubbles might appear on the surface. To remove them, a blow torch is used. The heat causes the air bubbles to escape out. The remaining bubbles can be popped using a sharp toothpick.
The bare photo won’t be able to hold a heavy resin coat for long. So before applying resin, make sure you give a strong base to your photo, like a coaster blank or piece of wood. The panel should roughly be of the same size as your photograph.
On glossy photos, epoxy resin can sit without any need for pre-sealing. But matte or rough photopapers should not come in direct contact with epoxy resin. The epoxy resin seeps into rough or matte photo papers.
This results in dark and wet spots because of ink smearing, especially at the edges. For that reason, a layer of Mod Podge or varnish is required to protect the paper.
Mod Podge is a multi-purpose formulation that consists of vinyl acetate. It is a highly water-resistant sealer that can also be used as an adhesive to stick photos to wood panels.
Required Items
- Epoxy resin
- Stirrer
- Measuring cup
- Rigid panel
- Mod Podge/thin glue
- Flat edged brush
- Blow torch
- Paint
- Sandpaper
Procedure [Step by Step]
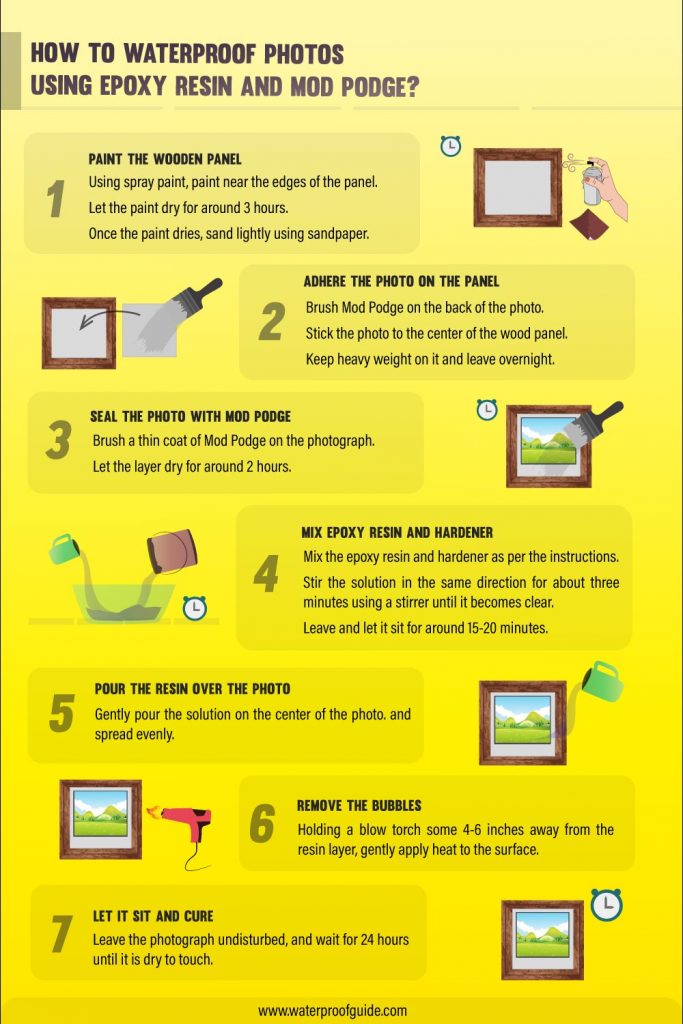
1. Paint the wooden panel (optional)
- Using spray paint, paint near the edges of the panel. Leave the center as it would be covered by the photo.
- Let the paint dry for around 3 hours.
- Once the paint dries, sand lightly using sandpaper.
2. Adhere the photo on the panel
- Brush Mod Podge on the back of the photo.
- Stick the photo to the center of the wood panel.
- Keep heavy weight on it to get seamless adhesion.
- Leave overnight until the Mod Podge is set.
3. Seal the photo with Mod Podge
- Brush a thin coat of Mod Podge on the photograph.
- Let the layer dry for around 2 hours.
4. Mix epoxy resin and hardener
- Pour the epoxy resin and hardener into two separate measuring containers.
- As per the ratio directed on the container, pour the required amounts of both of them into a measuring cup.
- Stir the solution in the same direction for about three minutes using a stirrer. Keep scraping the solution from the sides of the measuring cup.
- The solution becomes clear. Leave and let it sit for around 15-20 minutes.
5. Pour the resin over the photo
- Keep the wood panel on a raised block so that its edges are freely accessible.
- Gently pour the solution on the center of the photo.
- Using the stirrer evenly spread the solution towards the edges of the wood panel.
6. Remove the bubbles
- Holding a blow torch some 4-6 inches away from the resin layer, gently apply heat to the surface.
- Additional bubbles can be popped using a sharp toothpick.
7. Let it sit and cure
- Cover the entire setup with a cardboard box, or any such thing. Leave the photograph undisturbed, and wait for 24 hours until it is dry to touch.
- Depending on the environment the resin might take 2 or 3 days to cure completely.
Precautions
- Make sure you cover the working surface with an old cloth or paper before you apply the resin.
- When using a blow torch, keep moving it all the time.
- The poured resin remains workable only till 45 minutes from pouring. After that, it won’t spread smoothly.
- Even though the recommended resin is non-toxic, protect yourself using gloves and a mask.
Time
The whole procedure will take around 5 days to finish.
Cost
The approximate cost of required items:
- Epoxy resin (resin + hardener): $30
- Plastic measuring cup + stirrer: $10
- Rigid wood panel: $15
- Mod Podge/thin glue: $20
- Flat edged brush: $5
- Blow torch: $15
- Paint (optional): $5
- Sandpaper (optional): $5
Total Estimated Cost: $105


2. How To Waterproof Photos Using Fixative Spray and Mod Podge?
Fixative sprays stabilize the photopaper as well as the pigment of the printed ink. Giving a transparent layer to the photo, they protect it against water damage. Usually, these sprays are alcohol-based.
They contain substances like resin suspended in an alcohol solvent, for quick evaporation. They are the most effective sealers when it comes to preventing the ink from smearing. The ink pigments get fixed in their place, thereby the photo becomes sturdier to handle.
Fixative sprays are great at protecting the photograph from UV light. The damage from fingerprints and dust also reduces highly. These sprays are quick to dry since the alcohol evaporates quickly.
They only need 15-30 minutes of drying time. However, fixatives should be applied in light coats rather than a single thick coat.
Application of one thick coat must be avoided, as it can cause blobs and drips. A heavy final coat results in a glossy finish while a light final coat gives you satin sheen.
Fixative spray alone isn’t sufficient for a surface as vulnerable as paper. A final coat of Mod Podge fills in the remaining cracks and seals the photo completely.
It is a very versatile water-based sealer that is used in many crafts and DIY projects. 2-3 coats of fixative sprays along with a thin layer of Mod Podge on the outside, will make your photo waterproof. You can get Mod Podge from here:
Required Items
Procedure [Step by Step]

1. Clean the photo
- Take cotton swab and wipe away the dirt.
- Wet a fresh cotton swab, with very small amount of rubbing alcohol.
- Rub the cotton on the photo, in gentle and long strokes.
- Let the photo dry for 15 minutes.
2. Apply the fixative spray
- Keep the photo on some useless paper or polythene.
- From a distance of 3-4 feet, spray the fixative in horizontal motion, going past the edges of the photo.
- Avoid overlapping the strokes and spray a thin coat of fixative from the spray can.
- Let the first coat dry for around 20 minutes. (Read the direction on the product for accurate drying time).
- Coat the back side of the photo in the similar manner and wait until it dries too.
3. Successive coats
- After the first coat dries, spray both the sides using vertical motion, with 20 minutes drying time in between.
- Once the second coat is dry to touch, put the final coat of fixative spray on both the sides of the photo, in a similar manner as previous coats.
4. Give final coat with Mod Podge
- Using the flat edged brush, coat the front of the photo in uniform strokes.
- Try to cover as much area as you can in one stroke. Make sure brush strokes aren’t much visible.
5. Let it dry
- Within 24 hours the photo will be dry to touch and handle.
- Within 3 days of applying, the Mod Podge will cure completely.
Precautions
- Always use fixative spray in a well ventilated place.
- Use mask while spraying. Inhaling vapors might make you sick.
- Keep the fixative spray away from heat as it can be extremely flammable.
Time
The whole process will take around 4 days to complete.
Cost
The approximate cost of required items:
- Fixative spray: $15
- Mod Podge: $20
- Flat edged brush: $5
- Rubbing alcohol: $5
Total Estimated Cost: $45


3. How To Waterproof Photos Using Cold Lamination Pouches?
Lamination is a very straightforward way to waterproof photos for indoor or outdoor use. Lamination pouches are quite waterproof, provided that they efficiently cut off water from accessing the photo.
They are made up of transparent vinyl, which is a plastic polymer. Laminating both sides of photographs can provide them long-term protection against water.
Lamination sheets usually come in thicknesses ranging from around 3 mil to 10 mil, and offer finishes like glossy, satin, and matt.
Lamination is either done using a thermal laminator or cold lamination method. The latter simply makes use of an adhesive backing in pouches.
Cold lamination works better with photos because thermal lamination interferes with the temperature-sensitive ink of photos, and also damages the photopaper.
Furthermore, the lamination plastic should be acid-free, else the acid in plastic might react with the ink and give the photo a faded appearance over time.
Required Items
- Lamination pouch
- Scissors/paper knife
Procedure [Step by Step]
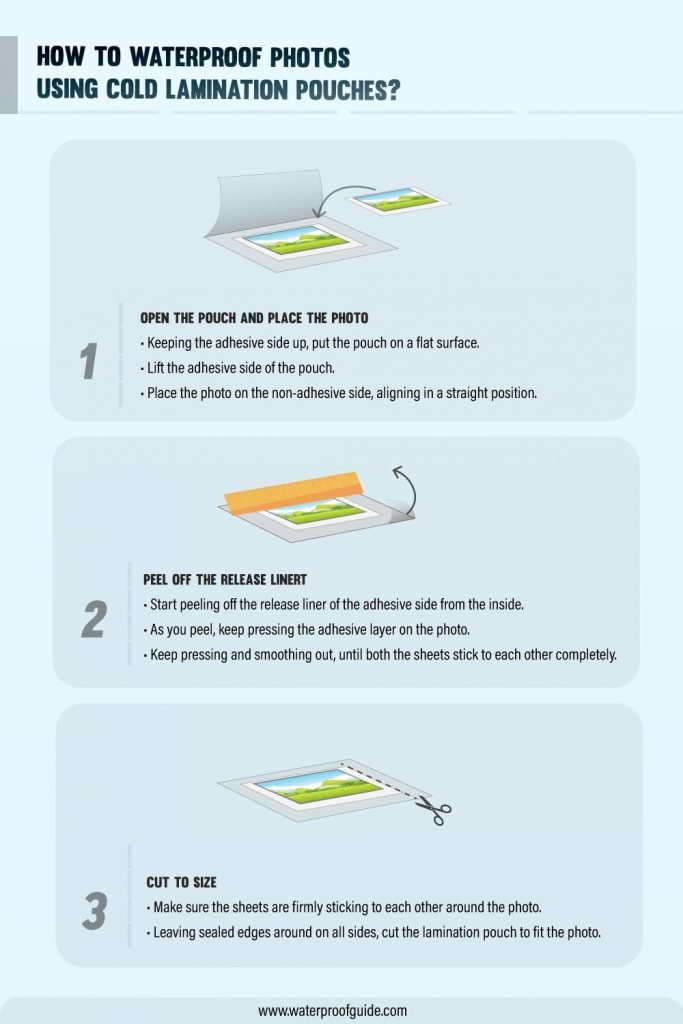
1. Open the pouch and place the photo
- Keeping the adhesive side up, put the pouch on a flat surface.
- Lift the adhesive side of the pouch.
- Place the photo on the non-adhesive side, aligning in a straight position.
2. Peel off the release liner
- Start peeling off the release liner of the adhesive side from the inside.
- As you peel, keep pressing the adhesive layer on the photo.
- Keep pressing and smoothing out, until both the sheets stick to each other completely. You can use a ruler/credit card for the same.
3. Cut to size
- Make sure the sheets are firmly sticking to each other around the photo.
- Leaving sealed edges around on all sides, cut the lamination pouch to fit the photo.
Precautions
- Lamination cannot be reversed. It is a permanent procedure.
- Lamination doesn’t prevent light from reacting with the ink pigment. The ink still stays UV light susceptible.
- After lamination, you can coat the photo directly with resin as well (as described in method no. 1) for extra protection.
Time
It will take up to 30 minutes to complete the whole procedure.
Cost
The cost of a small pack of lamination pouches will be around $5.
| Photo | Product | Buy |
|---|---|---|
 | Scotch Self-Sealing Laminating Pouches, Gloss Finish, Photo Size 4 x 6 Inches, 5/Pack | Check Price On Amazon |
Final Words:
Waterproofing photos depends on how you intend to use your photos later. 2-3 coats of fixative along with Mod Podge would make them enough water-repelling for inside use. But if you want to showcase your photos outside, then you better cover them in strong plastic, like epoxy resin.
Epoxy gives a thick waterproof layer to photos. But since its direct application to paper can cause more harm than good, the photo should be first sealed with a good sealer like Mod Podge. Lamination is a cheap and quick way to protect photos from outdoor conditions. Water can’t cross the lamination barrier.
However, lamination won’t render long-term protection against UV light, and the photo might start fading. So choose the method which suits your photos and purpose the most!


