
How To Waterproof Inkjet Prints? [Procedure, Time & Cost]
Inkjet prints are produced by liquid ink droplets. These inks get their color either from chemicals or from suspended solid particles. The most common problem with inkjet printing is the smudging of ink on exposure to water.
Inkjet prints smudge and bleed because inkjet inks, whether pigment or dye, are largely water-based. Therefore, unless the water content of these inks is expelled or absorbed into the paper, the ink will remain soluble.
Being cost-effective inkjet printers are preferred to laser ones. So to have a way of waterproofing inkjet prints comes in handy.
Waterproof ink is the utmost priority when it comes to making decoupage, collage, doing image transfer, etc. Methods like heating and freezing have been tried, but the basic tendency of inkjet prints to run and bleed doesn’t entirely go away.
Thus, effective sealers or fixatives are needed to waterproof inkjet prints so that they can have a broader range of application.
How To Waterproof Inkjet Prints?
Before waterproofing an inkjet print, one should ensure that the print has dried and cured. Waiting for 24 hours after printing would be advisable.
Below listed are 4 effective methods to waterproof inkjet prints.
- Using Acrylic Matt Medium
- Using PVA glue
- Using Lacquer varnish spray
- Using Hairsprays and Mod Podge
1. How To Waterproof Inkjet Prints Using Acrylic Matt Medium?
Acrylic matt medium is perfect to protect inkjet prints from the deteriorating action of water. Acrylic mediums are made up of certain liquids, oils, gels, or pastes along with acrylic binders. These mediums are used for changing the properties of acrylic paints.
For instance, sheen, drying time, texture, flow, transparency, etc. They are basically acrylic paints without the pigment added.
When used as a topcoat on the inkjet print, acrylic matt medium acts as a waterproof varnish. Acrylic matt medium has a thin consistency that gets easily absorbed by the inkjet paper, sealing the ink in the process.
Required Items
Procedure [Step by Step]
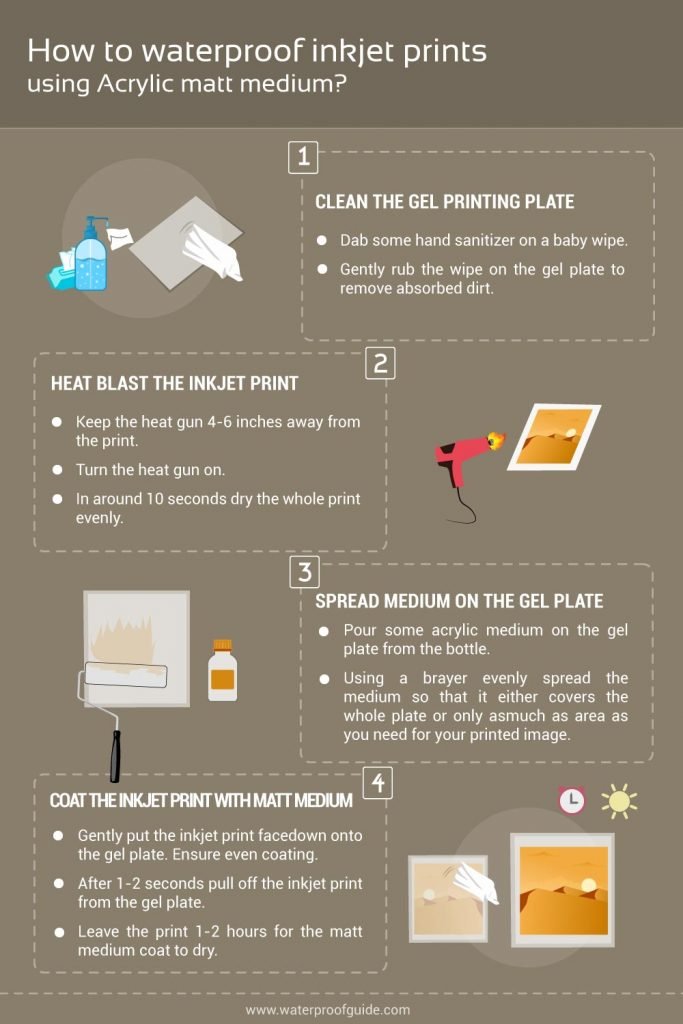
1. Clean the gel printing plate
- Dab some hand sanitizer on a baby wipe.
- Gently rub the wipe on the gel plate to remove absorbed dirt.
2. Heat blast the inkjet print (optional)
- Keep the heat gun 4-6 inches away from the print.
- Turn the heat gun on.
- In around 10 seconds dry the whole print evenly. Heat blasting ensures that the ink is firmly dried.
3. Spread medium on the gel plate
- Pour some acrylic medium on the gel plate from the bottle.
- Using a brayer evenly spread the medium so that it either covers the whole plate or only as much as area as you need for your printed image.
4. Coat the Inkjet print with matt medium
- Gently put the inkjet print facedown onto the gel plate.
- Rub on the inkjet paper to ensure even coating. You can use hands or the edge of an old credit card to do so.
- After 1-2 seconds pull off the inkjet print from the gel plate.
- Leave the print 1-2 hours for the matt medium coat to dry.
Precautions
- Cheaper paper might stick to the gel plate during pulling off. Therefore use a sturdy paper, and pull it off immediately.
- The gel plate can be simply cleaned using water and a wipe. Pat it dry using a paper towel before storing.
- Do not use a heat gun near the gel plate, since the gel is sensitive to heat.
Time
It will take you less than 3 hours to complete all the above-given steps.
Cost
Approximate cost of required items:
- Acrylic matt medium: $10
- Gel plate: $15
- Brayer: $15
- Heat gun (optional): $20
Total Estimated Cost: $60


2. How to waterproof inkjet prints using PVA glue?
PVA (Polyvinyl acetate) glues are made of vinyl acetate polymers. They seal the inkjet prints just fine for general protection against water.
The ‘tacky’ PVA glue proves more suitable (common white glue can be used as an alternative) for the waterproofing of inkjet prints.
PVA glues are meant to go on porous surfaces just like paper. They bond with the inkjet ink and thus it keeps it into place, without evident ink bleeding or smudging.
Once applied on inkjet print and dried, glues stay very flexible making the print foldable to any desired degree.
Tacky glues like the one linked blow have a very quick drying time as well. They’re thicker than other general glues and also, they bond more strongly with the inkjet ink.
Required Items
Procedure [Step by Step]
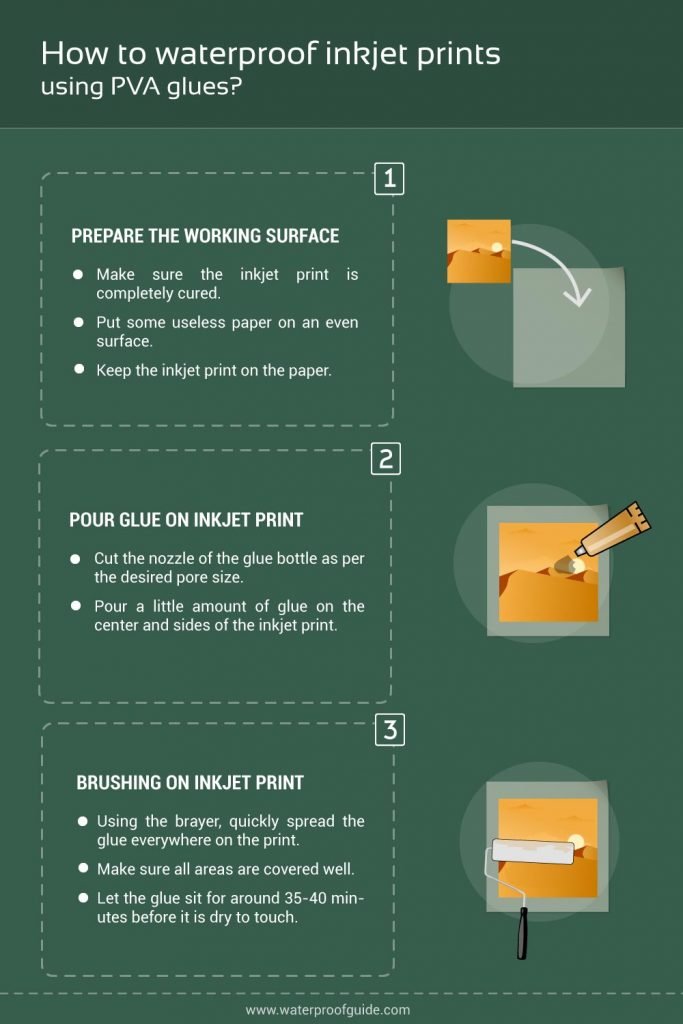
1. Prepare the working surface
- Make sure the inkjet print is completely cured.
- Put some useless paper on an even surface.
- Keep the inkjet print on the paper.
2. Pour glue on inkjet print
- Cut the nozzle of the glue bottle as per the desired pore size.
- Pour a little amount of glue on the center and sides of the inkjet print.
3. Brushing on inkjet print
- Using the brayer, quickly spread the glue everywhere on the print.
- Make sure all areas are covered well.
- Let the glue sit for around 35-40 minutes before it is dry to touch.
Precautions
- The tacky glue dries very quickly. Don’t leave blobs on the print for long, else they will ruin the texture of the inkjet print.
- The consistency of tacky glue is quite thick. Hence, over-application should be avoided.
- If you’re using any other white glue, you can coat it on your inkjet print using the gel plate method as well, as discussed in above section.
Time
The whole procedure will take approximately an hour to finish.
Cost
Approximate cost of required items:
- Tacky glue: $5
- Brayer: $15
Total Estimated Cost: $20


3. How to waterproof inkjet prints using Lacquer varnish spray?
Lacquer is another good way to protect inkjet prints from water. Even though lacquer has a thin consistency, liquid lacquer is not much suitable for art print. Wet coats might smudge the inkjet print before they even dry.
That’s why aerosol sprays are used which are designed to deliver a very fine mist. Alcohol-based sprays dry very quickly.
After the alcohol evaporates, the lacquer leaves behind a tough water-resistant barrier. Two coats of lacquer are advisable for achieving a good waterproofing action.
Such sprays also provide great protection against UV light. However, it should be noted that any spray would reduce the gloss if it is sprayed on a high gloss inkjet print.
Due to this, matt prints are considered best for spray application. But if the resulting semi-gloss sheen isn’t a problem for you, lacquer varnish spray will work just fine.
Required Items
Procedure [Step by Step]

1. Prepare the surface
- Take your inkjet print which has been dried for 24 hours minimum.
- Fix your inkjet print in a vertical position. You can use the lid of any old cardboard box, standing slantly, for the same.
2. Spray on the inkjet print
- Shake the spray can vigorously for some seconds.
- Position the spray can 8-9 inches away from the print.
- Press the nozzle and with a steady hand spray the lacquer from edge to edge in a straight motion.
- Keep going back and forth, with less than 50% overlapping, and release the nozzle at each end.
- After the print is covered, wait for 4-5 minutes for the coat to dry.
3. Spray the second coat
- After the first coat dries, rotate the inkjet print by 90°.
- Just like the first coat, spray again going back and forth in a straight motion, working all the way down.
- Wait for around 15-20 minutes for the lacquer coat to cure completely.
Precautions
- Avoid applying thick coats, as the varnish might bubble. And also, it can alter the appearance.
- Fixing your inkjet print vertically is important because horizontal positioning might make the print susceptible to drips and spits from the can.
- Such sprays can be quite toxic and pungent, therefore, they must be used in a well-ventilated place.
- They are flammable as well. It is advisable to keep them away from heat.
Time
It will take 2 days to finish all the steps.
Cost
Approximate cost of required items:
| Photo | Product | Buy |
|---|---|---|
 | Moab Desert Varnish UV Lacquer Spray to Protect Fine Art Inkjet Prints, 400ML Can | Check Price On Amazon |
Total Estimated Cost: $15
4. How to waterproof inkjet prints using Hairsprays and Mod Podge?
Surprisingly, hairsprays have also been shown to have a waterproof action on inkjet prints. They contain alcohol and dry and cure faster, thus, improving the water fastness of the ink.
Hairsprays prevent ink from washing off and protect against fading of pigments in long term. They are much less toxic and less pungent than spray fixatives and are made to use indoors. Besides, they are readily available and quite cheaper.
Required Items
Procedure [Step by Step]

1. Fix the inkjet print vertically
- Make sure you have a completely dried inkjet print.
- Stick the print to an upright piece of cardboard or any other vertical support, using a masking tape.
2. Spray the hair spray
- Shake the can a few times.
- Spray a light coat covering all the areas of the print.
- Wait for around 10 minutes for this coat to dry
3. Apply the topcoat of Mod Podge
- Dip the brush in the can and let go of the excess Mod Podge by rubbing on the edge of the can.
- Brush the Mod Podge in uniform strokes, without much overlapping between adjacent strokes.
- Wait for 24 hours so that the Mod Podge cures thoroughly.
Precautions
- If given a thick layer, the inkjet prints might crack on folding.
- Over time the print might yellow a little.
- Alcohol-based hairsprays are better at waterproofing. However, some hairsprays might not contain alcohol, as it can be bad for hair.
Time
The whole procedure will take around 2 days to finish.
Cost
Approximate cost of required items:
- Hairspray: $10
- Mod Podge: $5
Total Estimated Cost: $15


Final Words:
Having a waterproof inkjet print relieves artists from the ordeal of buying a laser printer. And as discussed above, there’s not much hassle in sealing inkjet prints either. Several easy-to-use products keep your ink in place for long.
Acrylic matt medium yields excellent results against ink smearing. Fixatives work equally well. These options are good when waterproofing is required at a professional level. PVA glues and hairspray with Mod Podge are good methods too.
These things are easily available and are usually cheaper. Before adopting any of these four methods, one should check whether the product is compatible with the particular ink or paper that you are using.
A spot test helps in this scenario. If chosen rightly, your inkjet print will stay resistant to water as well as to fading away and UV light, for a long time to come.


![How To Make Running Shoes Waterproof? [Step by Step]](https://waterproofguide.com/wp-content/uploads/2021/11/Running-Shoes-Banner-2-768x402.jpg)

