How To Make Waterproof Dog Boots? [Step By Step Process]
As the winter months approach, it’s time to start thinking about how your dog will cope with the cold, ice, and snow. Moreover, finding the ideal waterproof dog boots is not always suitable for your pet is not always easy, therefore many pet owners opt for DIY solutions.
By making the waterproofed dog boots on your own, you will not only be able to secure a flawless fit, but also you can save money.
If you wonder how to make waterproof dog boots, do not be concerned since I will provide you with the step-by-step process in this article.
Why Your Dog Needs Waterproof Boots?
Waterproof dog boots are meant to keep your dog’s feet warm, dry, and safe. Road salts and the chemicals used to deice icy roadways are both harmful. Between its toes, snow and ice can form dense lumps that can cut into its feet.
Boots also provide greater traction on slick areas, which is essential in wet or icy conditions. Cooler weather brings dry, itchy skin, but a decent pair of waterproof boots will keep your dog’s paws from becoming uncomfortable and cracked.
Best of all, you can take your dog’s boots off at the door so it does not track rain or ice inside. If you’re ready to try your hand at making your own waterproof dog boots, continue to read this article.
How To Make Waterproof Dog Boots?
By following the below procedure, you can make waterproof dog boots in quick time. Moreover, customizing the dog boots will also be cost-effective.
Now, let’s check out the required materials to create the waterproofed dog boots.
Required Items
- Measuring tape
- Faux leather
- Thick Patching fabric
- Pinking shears
- Sewing machine
- Leather-sewing needle
- All-purpose thread
- Elastic trim
Procedure [Step by Step]
1. Cut the faux leather
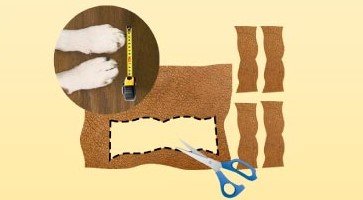
Measure the dog paws to start making the dog boots. Then cut the faux leather into 4 pieces to get attached to the seams. Always make a large cut so you can trim it later.
2. Create four patches

Take a patching cloth and cut it into 4 little circles using pinking shears. These patches will become the soles of your dog’s boots that give more warmth and traction to them.
3. Attach the soles

Now, attach the soles to the faux leather using a sewing machine. Also, if you do not have a sewing machine at home, you can use leather glue as well.
4. Make toe box

Place another leather on top of the first layer (plain side facing upward and leather side goes inside)
Sew the boot’s bottom side by leaving the top portion open. Now trim the corner off the leather to finish the toe box.
5. Sew the elastic

Now, measure the dog ankles and cut the elastic trim accordingly (usually 5 inches).
You need to place the elastic around the leather and sew it to provide a good fit on your dog’s paws.
Also, attach the elastic on the open sock leather edges to complete the dog boots.
6. Final step

Finally, you can also trim the edges and you are now ready to try the boots on your dog by turning them inside out.
Precautions
1. Secure Fastening
It can be difficult to keep dog booties on your dog’s paws. To keep DIY dog booties in place, they should have Velcro or a similar clasp. Not only are slipping dog booties inconvenient, but they can also be deadly! You don’t want your dog to lose his balance and damage himself.
2. Measure carefully
Proper measuring is essential for ensuring regular movement. Boots that are too loose might cause an unnatural or uncomfortable walk, while overly tight boots can cause discomfort or injury. For a perfect fit, measure or trace your dog’s paws.
3. Dog’s Comfort
Because most dogs are not used to wearing shoes, make sure you ease them into it. To keep stress levels down, avoid steps until he’s comfortable, and make the procedure entertaining.
4. Use High-Quality Materials
Because dog boots are meant to protect, you need to pick materials that can withstand wear and tear. So, once you have found a nice set of boots, make sure you put them together using high-quality materials.
If the booties are used on a daily basis, the materials should be durable enough to endure the elements, such as rain and concrete.
A gripping sole is required if your dog requires assistance walking around the home, and insulation is required for cold-weather pups to keep their paws warm and frost-free.
Time
The preparation and execution time for making waterproofed dog boots take around 45 minutes.
The total processing time is around 45 to 60 minutes.
Cost
Approximate cost of required items:
- Measuring tape – $9
- Faux leather – $13
- Patching fabric – $9
- Pinking shears – $ 9
- Sewing machine – $64
- Leather-sewing needle – $4
- All-purpose thread – $6
- Elastic trim – $9
The total estimated cost is $123.
Top 5 Best Waterproof Dog Boots
If you are looking for the best waterproof dog boots available in the market, please check out the below options:
Why Do You Need Waterproof Dog Boots?
Protecting your dog’s paws is essential in some conditions, such as harsh weather or outdoor outings. Dog booties can also help protect your dog from harm in some circumstances.
1. To Keep your dog’s paws warm
Hot pavements can scorch paw pads, whereas frostbite can be caused by snow and ice. Dog booties protect paws from these potential dangers.
2. To Keep your dog’s paws safe from any dangers
During a routine walk around the block, your dog may encounter glass and deicing chemicals, to name a few.
Thorns and splinters make things much riskier for barefooted barkers when they venture into the woods. Dog booties are necessary since pad injuries are excruciatingly unpleasant.
3. Provide traction for pets with limited movement
As your dog gets older, he or she may find it difficult to navigate the house, especially if you have hardwood floors. A nice pair of dog booties can provide extra traction for your woofer that pads alone cannot.
4. Prevent dogs from chewing or licking pads
Some dogs may groom and chew their feet excessively due to allergies or anxiety. Dog booties protect without requiring the use of deterrent sprays.
5. Avoid bringing mud and debris into your home with your dog
Nobody likes a dirty carpet therefore; dog parents can leave the mud and rain at the door with their own rain boots.
6. Protect your cozy hardwood floors and leather furnishings
Even the most meticulously groomed paws can harm flooring or furniture. In the long term, dog booties can save you money.


![How To Waterproof Plaster of Paris? [Procedure & Precautions]](https://waterproofguide.com/wp-content/uploads/2021/12/How-to-waterproof-1-768x402.jpg)


