How To Waterproof the Inside of a Wood Planter Box? [Infographics]
Wood planters are an essential element of container gardening. With proper love and care, they can yield wide varieties of edible and non-edible plants. Coming to caring, the drainage system is the crucial aspect of wooden planter boxes.
Even though holes are created at the base of planters, yet without solid waterproofing, things can go awry. Over-watering of plants and stagnant water may lead to the rotting of plants along with the planter wood.
Besides, clogged drainage holes might turn unsealed planters into decaying trash. So make sure you get the insides of your planter box waterproof before you go on to root your dear plants in them.
How To Waterproof the Inside of a Wood Planter Box Using Plastic Sheeting?
As a general scheme, plastic/tarpaulin sheet is kept as the bottommost layer in the wooden planter. Holes are made through the sheet to make way for water drainage.
The sheeting is done to the inner lateral sides of the planter as well, to have good waterproofing. It protects the water from seeping into the wood and holds the soil well. Moreover, it stops chemicals of wood coating from leaching into the soil and plants.
The sheet used is thick and heavy-duty. Following 6-mil low-density polyethylene (LDPE plastic) would be excellent for planter lining purposes. It is safe for plants and soil. It is heavy-duty at the same time.

Required Items
Procedure [Step by Step]

1. Prepare
- Clean the wooden box. Make sure there’s no mold or mildew. Bleach, sponge, and water can be used for the same.
- Let the box dry for a week. This is to give the expanded and moist wood enough time to shrink back to the normal.
- Drill the drainage holes if the planter doesn’t have them already. Three to six ¼ inch holes for small planters (less than 16 inches in diameter) and six to eight ½ inch holes for the bigger ones.
- Using a measuring tape, measure the length and width of the bottom as well as box sides. Add them into single dimensions of length, breadth, and height.
2. Lining the planter box
- Leaving 2-3 inches extra on all sides, cut out the plastic sheet according to the measurement. ( You can choose to have a double layer as well.)
- Center the sheet on top of the planter and then push it down carefully so that it evenly lines the box everywhere.
- Overlap the additional plastic on top, to the inner side of the planter.
3. Stapling the sheet
- Fix the sheet into place using stapling gun.
Precautions
Even though plastic sheet is crucial, coat the wooden box with waterproofing agents as well. Don’t rely only on the plastic sheet.
Time
After cleaning, the wood might take a week to dry. Once dried, lining the planter completely wouldn’t take more than an hour.
Cost
Approximate price of various items:
- Waterproof plastic sheet: $100
- Staple gun: $50
- Measuring tape: $10
Total Cost: $160


How To Waterproof a Wood Planter Box Using Caulk and Liquid Rubber?
Liquid rubber is hydrophobic and non-toxic, hence quite safe to be used inside planter boxes. It is incredible at adhesion, sealing any leaks and waterproofing the wood. Once dry, it forms a hard covering that lasts for many years.
This covering is an elastomeric membrane that is quite waterproof. Liquid rubber consists of additional curative and solvent which reinforce its waterproofing properties.
Liquid rubber sticks to most of the surfaces, except oil-based paints, vinyl, and silicon. Therefore, wood should be sanded clean before application.

Because liquid rubber is not that effective where two edges meet, caulking becomes essential. Caulk fills in the gaps and makes the wood watertight. Consider a silicone caulk and caulk gun for this purpose.
For applying liquid rubber, a standard brush can be used. A sandpaper ensures that the sealant adheres well.
Required Items
Procedure [Step by Step]

1. Clean the surface
- Give the wood a good scrub to wash away loose debris, grease or oil. You can use sponges, wire brushes, bleaches for the same.
- Wait for a week, until the wood is completely dry. Some moisture might get sealed in otherwise.
- Sand the wood gently.
2. Seal with caulk
- Cut the tip of caulk sealant in a slant manner and to the desired bead size.
- Load the caulk sealant in the caulking gun and apply on the inner edges of the planter.
- Before the sealant hardens, smooth it and ensure even application.
3. Apply Liquid Rubber
- Normally apply the liquid rubber using the brush until all the cracks and holes are filled.
- Wait for 2-3 hours until the first coat is dry to touch.
- Apply an additional coat.
- After 24 hours (at around 20°C) the liquid rubber will get cured completely. It would be ready to use.
Precautions
- Liquid rubber is non-toxic only when it is fully cured. Therefore until it cures properly it shouldn’t be used.
- Use gloves and make sure liquid rubber doesn’t stick to other surfaces. It dries quickly and is hard to lift off.
Time
The whole procedure might take 7-8 days. This includes a week’s time for the wood to dry after it is cleaned, and one day for rubber application and curing.
Cost
Estimated Cost:
- Caulk: $10
- Liquid sealant: $90
- Caulk gun: $30
- Sandpaper: $10
- Brush: $10
Total Approximate Cost: $150


How To Waterproof the Inside of a Wood Planter Box Using Caulk and Wood Sealers?
Sealers are oil or water-based formulations which form a layer over the wood, rendering it waterproof. They contain polymers, solvents, and wood-binding fibers.
Polyurethane, a polymer most commonly found in sealers, gets absorbed into the wood. It forms a continuous membrane without any cracks.
Another common polymer is silicone. It has amazing adhesion qualities and works as a strong glue at the microscopic level. The sealers, either polyurethane or silicone ones, provide excellent waterproofing.
When used inside planter boxes, they can last for up to 4 years or so. The durability largely depends on how the sealant is applied and on the condition of the wood surface.
Properly sanded wood, devoid of any dust or debris, holds the sealant better. Three layers of wood sealers would be sufficient for seamless waterproofing.
| Photo | Product | Buy |
|---|---|---|
 | Roxil Wood Sealer Cream (1.5 Gallopn Clear) - One-Coat 10-Year Waterproof Outdoor Wood Treatment & Sealant for Deck, Fence, Sheds, Furniture | Check Price On Amazon |
As the wood edges might get leaky, using caulk is advisable with wood sealers as well. Caulk and caulk gun along with a standard brush, and sandpaper to be used, are already mentioned above.
Required Items
Procedure [Step by Step]
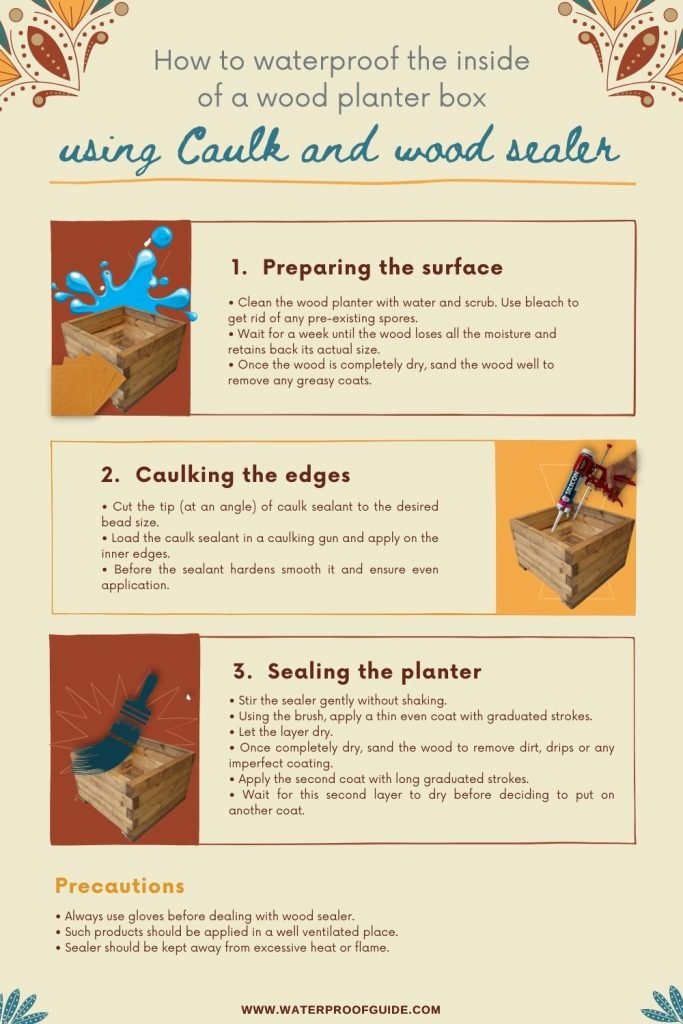
1. Prepare the surface
- Clean the wood planter with water and scrub. Use bleach to get rid of any pre-existing spores.
- Wait for a week until the wood loses all the moisture and retains back its actual size.
- Once the wood is completely dry, sand the wood well to remove any greasy coats.
2. Caulking the edges
- Cut the tip (at an angle) of caulk sealant to the desired bead size.
- Load the caulk sealant in a caulking gun and apply on the inner edges.
- Before the sealant hardens smooth it and ensure even application.
3. Seal the planter
- Stir the sealer gently without shaking. (If the mixture is too thick, it can be thinned down using a mineral spirit.)
- Using the brush, apply a thin even coat with graduated strokes.
- Let the layer dry (24 hours for oil-based dealer and 2-3hours for water-based one).
- Once completely dry, sand the wood to remove dirt, drips or any imperfect coating.
- Apply the second coat with long graduated strokes.
- Wait for this second layer to dry before deciding to put on another coat. Generally, oil-based sealers require 2-3 coats only, while the water-based ones might need more. Do as directed on the product.
Precautions
- Always use gloves before dealing with wood sealer.
- Such products should be applied in a well ventilated place.
- Sealer should be kept away from excessive heat or flame.
Time
It will take a week for the wood to dry thoroughly after it is cleaned. Besides, sealing would take around 2-3 days to finish.
Cost
Approximate Cost:
- Wood sealer: $40
- Caulk: $10
- Caulk gun: $30
- Standard brush: $10
- Sandpaper: $10
Total Cost: $100
How To Waterproof a Wood Planter Box Using Natural Oil Finishes?
Natural wood oils are highly water-resistant and work well to make the inside of a wood planter box waterproof. Oil molecules penetrate deep into the wood and nourish it as well. They replenish the dry wood, making it resistant to water damage.
The most common wood oils for sealing wood are linseed, tung and Danish oil. Danish oil is simply the polymerized version of tung or linseed oil. These nut oils are “drying” oils, that is they harden and get cured, providing a protective layer.
Depending on the type of oil, the wood gets stained with a yellowish tint. And even though the oil finishes aren’t as durable as synthetic sealants they do provide good sealing. Below are some good options to consider:


Required Items
- Danish/Tung/Linseed oil finish
- Natural bristle brush
- Lint-free rag
- 120 grit sandpaper
Procedure [Step by Step]
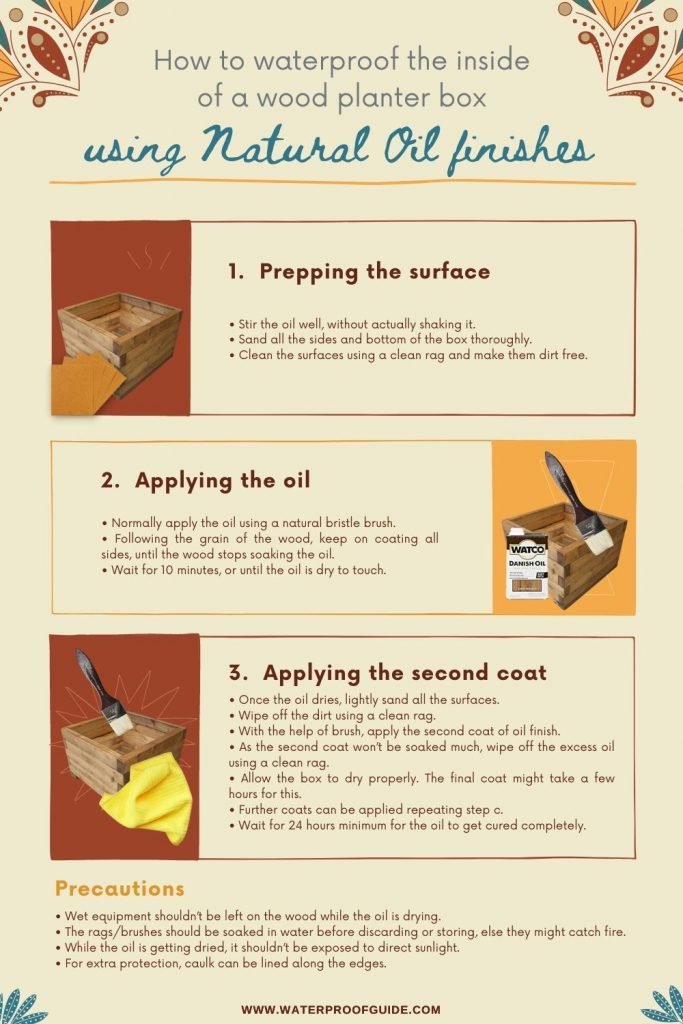
1. Prep the surface
- Stir the oil well, without actually shaking it.
- Sand all the sides and bottom of the box thoroughly.
- Clean the surfaces using a clean rag and make them dirt free.
2. Apply the oil
- Normally apply the oil using a natural bristle brush.
- Following the grain of the wood, keep on coating all sides, until the wood stops soaking the oil.
- Wait for 10 minutes, or until the oil is dry to touch.
3. Apply the second coat
- Once the oil dries, lightly sand all the surfaces.
- Wipe off the dirt using a clean rag.
- With the help of brush, apply the second coat of oil finish.
- As the second coat won’t be soaked much, wipe off the excess oil using a clean rag. This will ensure the uniformity of application.
- Allow the box to dry properly. The final coat might take a few hours for this.
- Further coats can be applied repeating step c.
- Wait for 24 hours minimum for the oil to get cured completely.
Precautions
- Wet equipment shouldn’t be left on the wood while the oil is drying.
- The rags/brushes should be soaked in water before discarding or storing, else they might catch fire.
- While the oil is getting dried, it shouldn’t be exposed to direct sunlight.
- For extra protection, caulk can be lined along the edges.
Time
The entire process would take 7-9 days depending on the product used and the coats applied.
Cost
- Danish/Tung/Linseed oil finish: $30
- Natural bristle brush: $20
- 120 grit sandpaper: $10
Total Approximate Cost: $60

Final Words:
The above methods will make sure your wood planter box is water protected. For the best waterproofing, use any waterproofing agent discussed above, and line the planter with a non-toxic plastic sheet.
Liquid rubber would be a great choice as it seals perfectly, and releases no chemicals into the soil. Wood sealers are terrific waterproofing agents lasting for several years.
Lastly, oils are natural and have low emissions of volatile organic compounds (VOCs). They will be a good option for waterproofing small or a medium-sized wood planters.


![How To Make Running Shoes Waterproof? [Step by Step]](https://waterproofguide.com/wp-content/uploads/2021/11/Running-Shoes-Banner-2-768x402.jpg)
