How To Waterproof Under Deck? [Procedure, Time and Cost]
The deck is a platform built to connect the building from the ground and it is usually covered using a railing. The decks allow the water to pass through and the gaps between decking boards in outdoor decks serve a crucial purpose for drainage. They help prevent puddles from forming and allow the surface to dry faster after rain or snowfall.
To extend the life of your deck, waterproofing is essential, and it helps maintain the durability of the decking material.
Few people prefer to use the space beneath the deck for storage. If you too want to use it, then, there should be a barrier created to stop the water.
Below are the ways that the deck joist drainage systems cause damage and wood rot:
First, they allow rain to drip through the deck boards, over the joists, and into the drainage system below, repeatedly wetting the wood. The water drenches the wooden joists as it strikes the pan and drains out.
Second, this technology can trap moisture. There is no air flowing in to dry off the wood if the ceiling panels are positioned beneath the deck. Only a quarter-inch or less of space between the top boards provides ventilation.
Third, the deck can get more damage due to exposure to UV rays. Over time, if your deck is exposed to moisture, heat and stays without ventilation, it leads to the destruction of the deck.
How To Waterproof Under Deck?
To protect your deck space from getting wet, you need to follow the waterproofing methods appropriately to achieve the desired results.
Below listed are the 3 most effective methods to waterproof under deck.
- Waterproof under deck using Tape roll
- Under-Deck Ceiling method
- Deck flanges method
1. Waterproof Under Deck Using Tape Roll
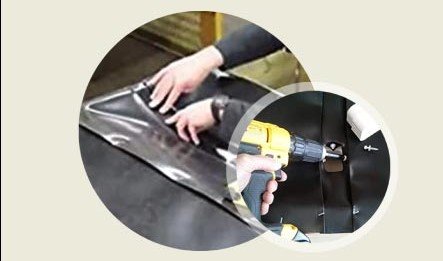
If you are looking for an easy and effective waterproofing method, this method is for you. Trex RainEscape tape is self-adhesive tape that plugs the gap between your house and the ledger board to keep water out.
Trex RainEscape is an over-the-joist deck drainage system that protects wood from 100% water damage. And it helps shield the surface under the deck from snow, sun, rain and other elements.
This method helps to hold the screw in the deck for a longer time and provides total protection for the deck boards from moisture.
Therefore, the entire wooden substructure is covered and protected by this type of deck drainage system. It can be installed on a wood or composite deck.
Required Items
Procedure [Step by Step]
1. Prepare the workspace
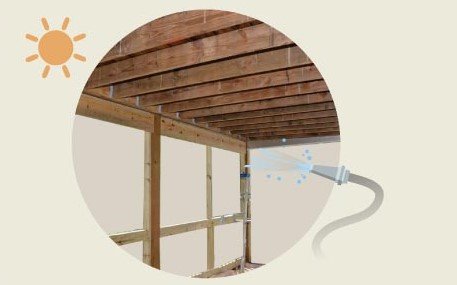
Clean the deck to make sure it is free from dust and dirt. Ensure the deck is completely dry before proceeding with the waterproofing method.
2. Seal the deck joints
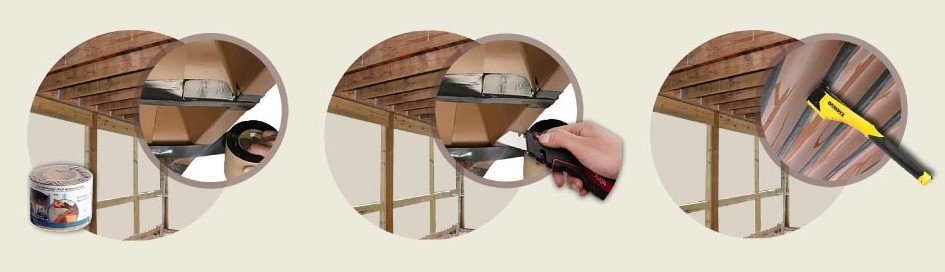
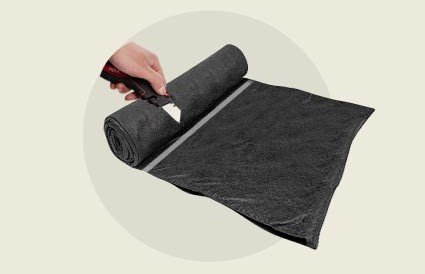
Unroll the TrexRainEscape membrane and position the same under the deck. You can cut the butyl tape and cover all the areas of the under deck.
Make sure to apply the butyl tape on all seams to make it waterproof. Then use the hammer tacker to make the tape stick onto the deck surface.
Done! The underdeck is waterproofed and ready for use.
Precautions
To apply pressure to butyl tape, do not use spiky concealed fasteners or any fastener lacking a flat base. Double-threaded screws should not be overdriven.
Standing on the tops of the floor joists, ledger, rim joists, or headers is not recommended. The Trex RainEscape device is not capable of supporting human weight.
Time
The application process takes up to 1 to 2 hours, and this method does not require any dry time since this method can instantly waterproof under the deck.
The total processing time is around 2 hours.
Cost
Approximate cost of required items:
- Trex RainEscape Butyl Waterproof Tape Roll – $6
- Utility knife – $10
- Hammer tacker – $ 29
The total estimated cost: $45.
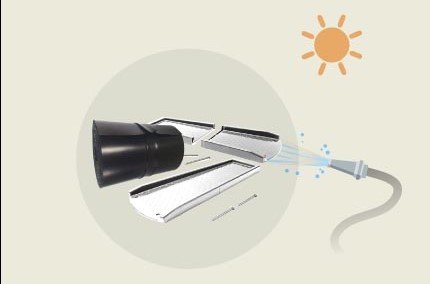
2. Under Deck Ceiling System
This method is a total time saver since you don’t want to worry about the durability of the under deck for years. Installing an under-deck system or adding guttering beneath the decking boards is the best option for under-deck water protection.
A finished ceiling and all-in-one drainage are provided by an underdeck ceiling system. These ceilings generate leak-proof couplings by locking them together along their long edges.
Corrugated plastic or aluminum panels are frequently used in these ceiling systems to absorb water that flows through decking material and route it away from the area below.
Moreover, a deck drainage system installed during construction is the finest approach to waterproof under your deck. Since water is diverted away from the joists and beams by a drainage system.
Required Items
- Trex RainEscape Downspout
- Trex RainEscape Trough
- Scissors or utility knife
- Staple gun
- Caulk gun
- Midspan nailer
Procedure [Step by Step]
1. Prepare the workspace
Make sure the troughs and downspouts are dry and debris-free before applying the tape.
2. Install Trex RainEscape Downspout
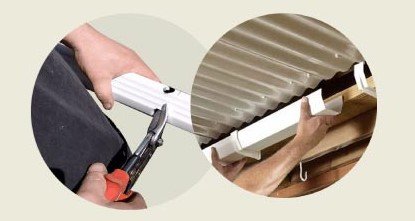
Based on joist spacing, cut downspouts on 12′′ or 16′′ side by the score mark.
Cut the downspouts on the outside and install all downspouts along one rim joist and/or ledger board.
Cut or lengthen the downspout to 1 inch into the gutter if required.
3. Install Trex RainEscape Trough

This is the most time-consuming process. When working with Trex RainEscape trough material, make sure the soft and smooth side is upwards at all times.
To lengthen the length of the troughs, do not overlap them. Repeat the installation procedure for the remaining joists.
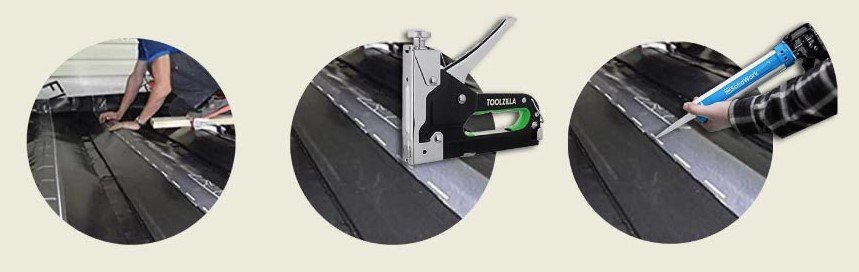
4. Tape All Seams
Once the installation is completed, work using tapes.
Make sure the tape completely covers all seams and any areas where the Trex RainEscape system will be penetrated by a screw.
You can use a midspan nailer on the underside of the joists for perfect sealing.
Precautions
While working on the deck, you need to be careful by not puncturing the deck that causes a leak.
Make all joists square and straight, and install gutter outlets every 12′ – 14′. Also, trough material should be used to cover all joists and blocking, then taped.
The Trex RainEscape system should be covered with deck boards. Trex RainEscape products can be used over floor joists, ledger, rim joists, and headers.
Time
The installation process takes up to 4 to 5 hours, and this method can completely waterproof under the deck.
The total processing time is around 5 hours.
Cost
Approximate cost of required items:
- Downspout – $32
- Trough – $81
- Staple gun – $16
- Caulk gun – $29
- Midspan nailer – $39
- Utility knife – $10
The total estimated cost: $207.
3. How to Waterproof Under Deck Using EPDM Pond Liner?
EPDM (Ethylene Propylene Diene Monomer) pond liner is a type of rubber flexible pond liner used under your deck to avoid water leaks.
The pond liners are simple to install and also, can handle harsh weather conditions and high temperatures. It can hold water for a long time and is also resistant to UV rays under the deck.
Also, the pond liners have high water repellent nature that is designed to prevent water from penetrating through under deck.
This EPDM liner can help prevent water seepage in the seams under the deck since these liners have a thick texture to provide water resistance.
Required Items
- Pond liner
- Silicone caulk
- Scissors or utility knife
- Staple gun
Procedure [Step by Step]
1. Pre-installation
Unroll the EPDM liner on the floor so that it gets smooth, and this helps to remove the wrinkles of the liner. Prepare and cut the EPDM liner to fit the under deck.
2. Installation
Seal the EPDM liner on each seam under the deck and use the staple gun to seal it properly. Repeat the same step for the remaining seams all over the deck.
Then use silicone caulk to cover the staple that results in absolute protection for the under deck. Once the liner gets set with the caulking, it provides desirable results.
Precautions
Proceed with the lining of seams using EPDM liner and then apply the caulk to seal the staples. And wait for some time to get the caulk dry on the surface.
Time
The installation process takes up to 2 to 3 hours including the dry time of the caulk applied on the staple under deck.
The total processing time is around 3 hours.
Cost
Approximate cost of required items:
- Pond liners- $149
- Silicone caulk – $8
- Utility knife – $10
- Staple gun – $16
The total estimated cost: $183.

![How to waterproof fabric naturally? [step by step]](https://waterproofguide.com/wp-content/uploads/2022/02/How-to-waterproof-fabric-naturally-768x402.jpg)


